
Months later, still salivating over my memory of those wings, I started looking at pricing. Stunned to find the brand-name commercial eggs cost $1000-$1500, I almost dropped the idea. Not long after, I read the article on blog.makezine.com about home-brewed smokers using flower pots and electric hot plates. I was inspired! How hard could it be to go a step further and make and honest-to-goodness, charcoal burning, big green egg knockoff? As it turns out, not very hard at all. May I present the Little Blue Egg:

And now, the build log.
One of the most challenging parts of the project was finding the right size and shape of pots. I was looking for heavy-walled glazed ceramic pots, including a smaller size to fit inside the lower pot and act as a firebox. Eventually I found what I needed at Home Depot.

The pots were actually on sale, so the three pots came to about $80.
The outer pot was a '15" Pickle Pot Blossom Blue' and the inner was a 12.75" version of the same. Both were by New England Pottery. What I looked for when I bought these pots was the following:
- Something large enough to grill a reasonable amount of food.
- Something with a flat rim so the top and bottom pots would be stable resting on each other.
- An inner pot that fit right down inside the outer leaving a small air gap. I was concerned that if the inner pot was too tight it might break the outer when it expanded with the heat of the fire.
- An inner pot that was slightly shorter than the outer so it would support the grill.
I decided to use glazed pots for weather resistance. I thought it would be better if the clay stayed dry to minimize the risk of the pot shattering.
Next up: A grill. I couldn't find a round one close to the right size, so I bought a universal fit. I figured it's universal, it should be able to fit *any* size of grill, right? I should note I was a little horrified at the price of the grill - about $30! Grr. I was hoping to keep this project around $100 and my budget was already blown.

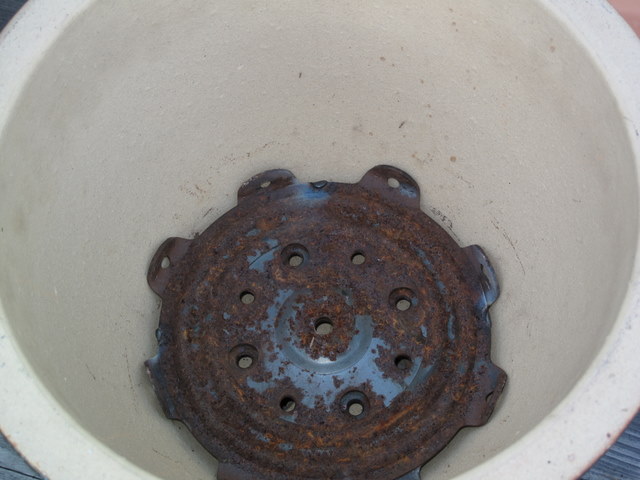
I also needed a grate to support the charcoal inside the firebox, so I scrounged an ugly old bearing mechanism from a lazy susan or office chair or something. Now the work begins.

I started by cutting the bearing apart with my angle grinder, flipping the top plate over, tack-welding it to the lower plate, and bending the tabs so it fit nicely into the inner flowerpot. Or should I say firebox.


Next up was cutting out the bottom of the firebox to allow air to enter and ash to leave. I used a diamond wheel on my 4.5" angle grinder. I already had the diamond wheel, but if I recall correctly it was about $20 at Princess Auto. I've heard Princess Auto is the Canadian version of Harbour Freight in the USA.
I was a little nervous about breaking the pot with the final removal of material, so I have a few photos as I did the cutting. First the plan:

Next, the cuts.

The moment of truth...

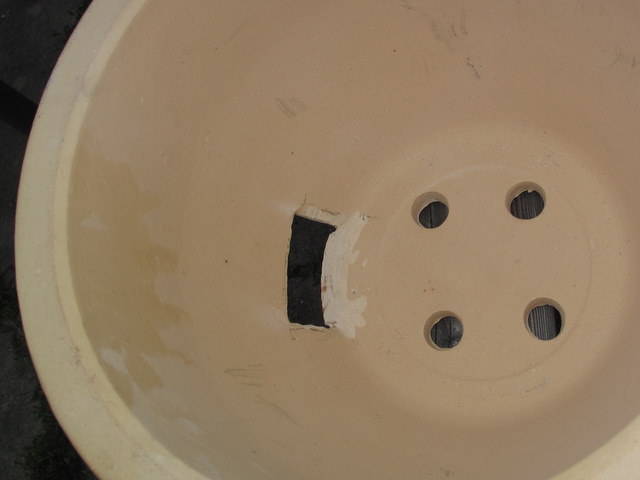
Next step was to test fit the firebox in the outer pot and plan on where to cut to allow air to enter.

I used my diamond hole saws ($20 for the set from Princess Auto) to add a few more air holes just above the fire grate. I don't know how necessary these are, but the big green eggs have them so I followed suit.


Things were moving right along. I cut a hole in the outer pot just large enough to insert a piece of 1.5" X 3" rectangular tubing as an air inlet.


I slid the pipe into place and traced the profile of the intersection between the inside of the pot and the pipe.

This is another test fit of the firebox into the outer just to confirm it would all go together when the air inlet pipe was put in place.

I rough-cut the tube along the pecil line, then machined the end on my milling machine so I would have a good sealing surface for my damper.

Having roughed-in the air inlet pipe and the firebox, I thought it might be about time to make the grill fit. Turns out "Universal fit" isn't all it's made out to be. I sliced and diced, bent, and re-welded the grill. You'll see the final version in a couple of photos.

At this point I was itching to find out if the flower pots would take the heat. I'm a big believer in a quick and dirty prototype before investing a lot of time finishing things. At this point I had only put in about 4 hours work and $110. If the thing was going to explode on me, I wanted to know now. I used some steel wool to plug the unwanted holes in the bottom of the lower pot. The finished grill can also be seen in this photo.

I pulled the basic supplies together, and lit the coals.

I used a chunk of angle iron as a primitive damper to control the airflow.

- Prototype version of an air damper
Where there's smoke, there's fire!

I tried to warm it up slowly, but I still heard some disturbing cracks and pops from inside. I have to admit I was a little disconcerted. On further inspection though, only one crack was visible on the inner firebox. I've since used the grill 20-30 times and I haven't had any further cracking of the firebox. There is just one big crack top to bottom that opens and closes as the firebox heats up and cools down.
At this point I had hot coals for the first time, so I decided to throw a couple of burgers on for the heck of it. They cooked pretty slowly, because I was being timid with the heat, but were very tasty and juicy. So far so good!

This is as far as I got on the first night. I had put in 7 or 8 hours including the first fire test, and was very encouraged to continue.
Next up: Refinements.
I made up an inlet air damper, which ended up working quite nicely. It will form a near-perfect seal when closed and tightened down. It seems to pivot well and it's easy to control the airflow. I have a welder so I just welded a nut on the inside of the tube, and used a bolt as both a pivot and a clamp. I welded a short chunk of 1/4" rod to the top of the bolt to create a nice handle. The whole assembly is held in place with kitchen and bath silicon caulking, which is rated to 400F (204C). The outside of the base only seems to get to about 160F (70C) so I figured it would take the heat. So far so good.

I used the same concept for the exhaust damper assembly. I also added a handle to allow me to lift off the lid without gloves. While I was at it, I added a thermometer. It was a replacement part from a hardware store, and cost around $10.

I still hadn't sorted out a good gasketing system to go between the upper and lower pots, so I broke down and paid $30 for a genuine replacement big green egg gasket.

Here's the gasket in position.

This completed day 2 of working on the project. I probably put another 6-8 hours in, including cutting the hole for the exhaust damper, drilling for the thermometer, building the inlet and outlet dampers, installing the gasket.
At this point, I was pretty happy with my Little Blue Egg. The coals started easily, the food was tasty and juicy, and generally all was well except on the ergonomics front. It was a bit of a pain having the grilling surface only about 12" off the ground. Bending over to tend the food also meant smoke in the face.
I decided to put it in a proper base. I bought a cheap butcher block table from Ikea (about $50) and cut a hole in the top.

I put a couple of coats of UV resistant Spar varnish on the table to protect it from the weather. I had previously measured the outside of the egg and found that it never seemed to get over 70 degrees C, so I wasn't worried about putting it in direct contact with the wood.


And here are a few photos of some smoked salmon I made on the egg a few days ago.


Here are some ribs cooking. Mmmm, smoky.

Next up: a side wing for the table so I have a place to put a plate, and a better lid lift mechanism. Lifting the lid by hand works ok, but it's a little awkward now that the grill is up higher. I think I might also come up with a cover plate for the exposed underside of the flowerpot around the exhaust damper to make it look a little more finished.
If you made it this far, thanks for reading.
Nigel
This comment has been removed by a blog administrator.
ReplyDeleteBrilliant Nigel!
ReplyDeleteHave you got a list of the actual parts used, IE: brand and model of flower pots etc.?
Alternately, maybe a description of what to look for in the materials when shopping for a substitute?
Done! Post edited.
ReplyDeleteGreat project, Nigel!
ReplyDeleteA couple of questions if I may:
What temperatures have you used for cooking so far? Is the crack in your fire pot random, or did it start at a corner of a saw cut or drilled hole?
Thanks ever so for sharing your project.
How is the exhaust damper attached to the top that allows it to be lifted?
ReplyDeleteFantastic project. Thanks!
Nigel,
ReplyDeleteWhat an excellent project! Very well implemented. Thanks for sharing your handiwork.
Thanks for the comments. To answer a few questions:
ReplyDeleteMomojuju: I have found the lowest sustainable temperature is about 175F. That's the temperature I used for smoking the salmon. I have had it up as high as 500F to sear a steak. I'm not sure what would happen if I went higher. Perhaps the firebox would suffer. At any rate, 500F is plenty hot for steak so I haven't pushed it any further.
The crack started at the corner of the air cutout on the inner pot, and propagated up to the rim. It opens up about 1/16" when the firebox is hot, so I would imagine if it hadn't cracked there it would have cracked somewhere else. It doesn't seem to negatively affect the performance of the grill at all.
Ryan: I welded a couple of pieces of steel to the underside of the exhaust damper to support the weight of the pot. The caulking mostly seals the gap and prevents the damper from falling into the grill. If you don't have a welder, the same thing could be accomplished by bending out some tabs underneath, or by drilling holes and inserting steel bars through the holes that protrude enough to support the weight.
I'd suggest next time trying to find a way to round the corners of each of those cuts as a stress relief measure.
ReplyDeleteThis looks like an awesome project! I'm hoping to start looking for parts for my own sometime soon.
Seems like a cool project. Unfrotunatelly the post seems to be broken, second half of it won't load and pictures are missing. Would be nice if you fixed it. Thanks, looking forward to reading the rest ;)
ReplyDeleteSecond the request for the pictures fixed in the 2nd half, though kudos - I can tell you did a sweet job on this project. Look forward to seeing the rest so I can consider my own grill project.
ReplyDeletethird for the pics. i have a char griller smokin pro. cost me about $200 plus mods, but its big and bulky, the paint is peeling off already, and the temp is not that easy to control. would love to see how you pulled this off.
ReplyDeletegreat project. are the pics hosted anywhere else?
ReplyDeleteI'd like to triple the request for a repost. I've been looking for something just this nice. And since LifeHacker has featured your article, there will probably be lots of others.
ReplyDeleteHi-
ReplyDeleteI have been perusing craigslist and have found a couple of pottery kilns for sale. Seems like they would hold constant temps well, any ideas...Kiele
Sorry about the broken images people, should be fixed. My poor little server at home hosted them for a while and it took me a while to transfer them to Blogspot.
ReplyDeleteThis looks very good....gonna try to make some.....fun fun fun.....thanks
ReplyDeleteOn other sites people have been warning about the lead/other toxins content of the ceramic pots and the glaze. Is there any basis to this?
ReplyDeleteWhat is the difference between this and a charcoal grill? Doesn't a smoker usually use soaked wood chips to produce smoke?
ReplyDeleteDamn fine work young fella. I hear your frustration on the grates. Just a thought though, I have an old "fire pit" (stainless thing with a metal mesh top) and it came with a 12" diameter round grill. Seen a few at the thrift shops in various sizes too; maybe those wishing to try this should keep that in mind while gathering parts...
ReplyDeleteIKEA sells cheap stainless steel grill replacements as trivets for $7 USD
ReplyDeleteDo you think you could put a video on youtube with the blue egg in action?
ReplyDeleteGreat Job, Nigel!
ReplyDeleteI was going to post this to the BBQ forums that I moderate, but I thought I'd extend an invitation for you to join and share your project.
Thanks!
Brian
(joneser)
www.theqjoint.com/forum
Hay, first time here, a friend sent me over. You get a crown to wear all day for the best build ever!
ReplyDeletexo, Biggles
meathenge.com
Great build!! Great Write-up!! Looks like I have a new project. Thanks!!
ReplyDeleteJerry
Great project and I really love your build notes and pics. Very inspiring and the food looks DELICIOUS!
ReplyDeleteThats pretty neat, but pots are fired up to 800 degrees, The Big Green Egg and others are fired up to 2100 degrees-i don't think that is going to hold up
ReplyDeleteHi Mike, I checked with Nigel and he said that these pots were hard fired at a much higher temperature than 800. Don't know if it was 2100, but maybe he can fill us in.
ReplyDeleteSufficed to say, though, the ceramics on these pots were pretty hard to drill through, needing three progressively larger masonry bits to drill just the hole for the thermometer.
I've asked Nigel to post some details on how to choose a set of pots for the best materials.
Hey Nigel, that look's real cool but kinda hard for a mechanically challenged person like me. How much would you charge me to build n ship me the whole set, cooker n stand????
ReplyDeleteThe best inventors are those who turn ordinary items into extraodiary creations. You are a creative inventor.
ReplyDeleteA suggestion on the grate... when I was at Home Depot today looking for the pots to try this project, I also looked for grates. I found out that a replacement charcoal grate (i.e., the lower grate) for the 18" Weber Kettle seems to fit without modification.
ReplyDeleteI just wanted to mention that the initial cracking may be because the clay was not seasoned. When using baking stones, they are heated slowly to max temp over several hours to completely dry out the stone/clay/tile so that there is no moisture trapped deep inside, which when heated quickly turns to steam in the porous stone and causes cracking.
ReplyDeleteI too am concerned about the glazed surface of the firebox. That might leach lead in a gaseous form if hot enough. How hot I don't know. But it's a nice project, and well executed. I'm trying to fit a kamado shell I got hold of with some sort of pottery firebox, but it's hard to find the right unglazed piece.
ReplyDeleteNigelNigelNigelNigel!
ReplyDeleteGreat job!
Ceramic flower pots like the one used are fired to a bisque temperature usually above 1600 degrees f. They are permanent, meaning that the clay will not slake back into mud. The other benefit of bisque fire is that it makes the clay body porous (able to soak up the glaze slurry). Normally it would be fired again to mature and melt the glaze.
ReplyDelete...stay with me a bit longer... One is able to drill and cut through the flower pot because the clay body is porous and relatively soft. This porosity has its flaws too. It can easily crack, will soak up food residue and carbon smoke readily, as well as any weather moisture. This expansion and contraction (especially with water moisture) will eventually deteriorate the clay body. Sorry to bring the bad news.
A clay body that is fired in a kiln to its specific maturation rate will not be porous, but it won't allow drilling and cutting either...dangit.
What Nigel has done is fantastic! He seems to be successfully keeping his egg from deteriorating. Dry climate? Care with slowly "sweating out the moisture?" I'm impressed.
If anyone knows a clay artist/potter see if they will make one. Perhaps with the inlet and exit flues made from clay and then fired to the maturation temp.
-Matt
Now that this smoker is coming up on one year old, I am interested to know how it is faring. How frequently has it been used? Are there any signs of deterioration? Has it's ability to cook remained constant through out it's life so far?
ReplyDeleteRegards
GREAT JOB, Nigel! Both on scrounging parts and building it but also in taking clear pix and describing the steps. This will be my next project.
ReplyDeleteThanks ever so much. RJ
This comment has been removed by the author.
ReplyDeleteEggciting! Another project! I think I will enroll in a pottery class at the community college and make the clay pots with the damper and other holes pre-fired. Plus the use of the college's kiln too boot! Thanks Nigel!
ReplyDeleteCongrats Nigel !!!... excelent work... how is it handling ???
ReplyDeleteI was also inspired by the blue flower pot design I saw a few yrs ago. I lost the link but this may have been the blog site. I have construction pix If you wish to see them. I use a different design for holding the charcoal. I can refuel or add wood without removing the lid and the airflow is adjustable from below as well as above also. I have modified the design somewhat and have been using it successfully for several yrs now.
ReplyDeleteI was also inspired by the blue flower pot design I saw on this blog site. I have construction pix If you wish to see them. I use a different design for holding the charcoal. I can refuel or add wood without removing the lid and the airflow is adjustable from below as well as above similar to your design. I have modified the design somewhat and have been using it successfully for several yrs now. I use a charcoal starter tube and adapted it to the base of the flower pot, it can be slid up and down and removed to refuel.
ReplyDeleteSkip,
DeleteI'd like to see your design and construction pix. Do you have them online somewhere or could you email them?
This has got to be the best build for a grill that I've come across.
I don't have them online because the original pix design was changed and I didn't update the pix to reflect that. The concept is the same just some clamping changes. I can find the pix and repost with the pictures on this blogspot if it's possible. I can email as well.
DeleteDave,
DeleteHere is the link for my smoker
http://skilue.blogspot.com/2012/08/another-little-blue-egg.html
Inspiring stuff. I build one last weekend just using tarracotta pots, and intend to have another go soon (my pot was cracked to start with which grew rather large during cooking!)
ReplyDeleteI like the mods to allow varying ventilation - that's really what I need to do next on mine. My blog is here:
http://mattdurkin.blogspot.co.uk/2013/09/diy-charcoal-smoker-oven.html
Late to the party but great job. I competitively BBQ on a green egg and will now build one of yours as a secondary at comps.
ReplyDeleteLarry Smith
Las Vegas Nevada
This comment has been removed by the author.
ReplyDeleteWhat should I use to clean my canvas folding chairs?
ReplyDeletekamado Grill
Soap. You should use soap.
DeleteHello Nigel hope all is well
ReplyDeleteI am going to do this Little Blue Egg thing
Is there really a hazard of lead poisoning here or is it just BS?Whats your opinion and experience so far Best Regards Dave Doyle Los Angeles
This comment has been removed by the author.
ReplyDeleteWe built this with your instructions and a few modifications. Thank you so much for taking the time to write this, it works real nice!
ReplyDeleteThe modifications we made were:
1) two handles on the top lid: just a piece of wood and some all thread
2) purchased the chimney part on top through Amazon for $44 https://www.amazon.com/gp/product/B00Q3WVKEE/
3) mounted some L-brackets a few inches below the grill grate for putting a plate setter, which is just an 10-inch clay saucer like this one covered in aluminum foil: http://www.homedepot.com/p/Pennington-10-in-Terra-Cotta-Clay-Saucer-100043041/100176773
4) sliced a vertical crack in the firebox with an angle grinder to prevent cracking like the new fireboxes from the BGE
i'd be curious on the performance in comparison to an actual green egg
ReplyDeletethis is really nice to read..informative post is very good to read..thanks a lot! PROJECT DRAFT
ReplyDeleteYou Can Also Find In Best Offset Smokers
ReplyDeleteOverall, casino sites are really famous. It usually has a long dynamism span. However, a new online gambling site does not take aim that it cannot be trusted. look for licenses from foreign organizations that oversee and manage online gambling operations. The premium facilitate provider will always display this information. And website pages, updated opinion at any become old and various forms of convenient financial transactions. like you visit the facilitate provider's website, you apply to become a enthusiast to log casino bingo on your betting account. locate a trusted support provider to avoid visceral scammed.
ReplyDeleteAs a result, these people use marijuana in large amounts for longer periods of time than what they intend to. สมัครแทงบอลไม่มีขั้นต่ำ
ReplyDeleteAmazing post you have shared with us. Keep sharing more detailed information of how to grill without charcoal, If you need any help then please visit our website Grill and Grilling.
ReplyDeletehttps://www.al-mnarr.com/%D8%B4%D8%B1%D9%83%D8%A9-%D9%83%D8%B4%D9%81-%D8%AA%D8%B3%D8%B1%D8%A8%D8%A7%D8%AA-%D8%A7%D9%84%D9%85%D9%8A%D8%A7%D9%87-%D8%A8%D8%A7%D9%84%D8%AF%D9%85%D8%A7%D9%85/
ReplyDelete