
Months later, still salivating over my memory of those wings, I started looking at pricing. Stunned to find the brand-name commercial eggs cost $1000-$1500, I almost dropped the idea. Not long after, I read the article on blog.makezine.com about home-brewed smokers using flower pots and electric hot plates. I was inspired! How hard could it be to go a step further and make and honest-to-goodness, charcoal burning, big green egg knockoff? As it turns out, not very hard at all. May I present the Little Blue Egg:

And now, the build log.
One of the most challenging parts of the project was finding the right size and shape of pots. I was looking for heavy-walled glazed ceramic pots, including a smaller size to fit inside the lower pot and act as a firebox. Eventually I found what I needed at Home Depot.

The pots were actually on sale, so the three pots came to about $80.
The outer pot was a '15" Pickle Pot Blossom Blue' and the inner was a 12.75" version of the same. Both were by New England Pottery. What I looked for when I bought these pots was the following:
- Something large enough to grill a reasonable amount of food.
- Something with a flat rim so the top and bottom pots would be stable resting on each other.
- An inner pot that fit right down inside the outer leaving a small air gap. I was concerned that if the inner pot was too tight it might break the outer when it expanded with the heat of the fire.
- An inner pot that was slightly shorter than the outer so it would support the grill.
I decided to use glazed pots for weather resistance. I thought it would be better if the clay stayed dry to minimize the risk of the pot shattering.
Next up: A grill. I couldn't find a round one close to the right size, so I bought a universal fit. I figured it's universal, it should be able to fit *any* size of grill, right? I should note I was a little horrified at the price of the grill - about $30! Grr. I was hoping to keep this project around $100 and my budget was already blown.

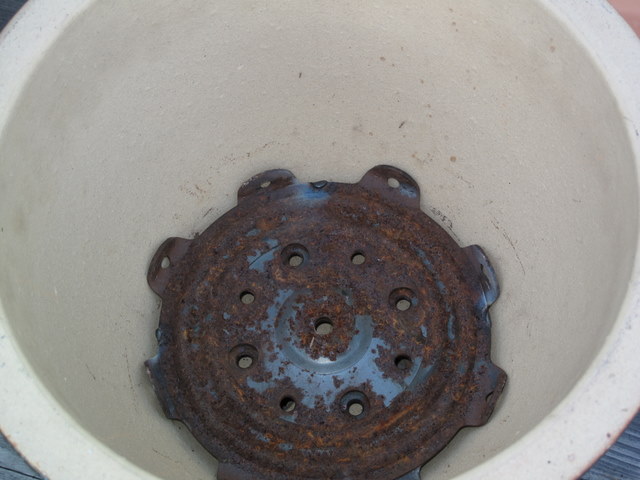
I also needed a grate to support the charcoal inside the firebox, so I scrounged an ugly old bearing mechanism from a lazy susan or office chair or something. Now the work begins.

I started by cutting the bearing apart with my angle grinder, flipping the top plate over, tack-welding it to the lower plate, and bending the tabs so it fit nicely into the inner flowerpot. Or should I say firebox.


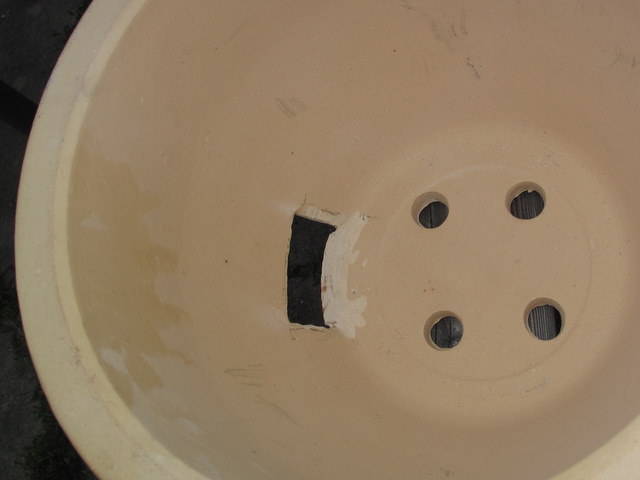
Next up was cutting out the bottom of the firebox to allow air to enter and ash to leave. I used a diamond wheel on my 4.5" angle grinder. I already had the diamond wheel, but if I recall correctly it was about $20 at Princess Auto. I've heard Princess Auto is the Canadian version of Harbour Freight in the USA.
I was a little nervous about breaking the pot with the final removal of material, so I have a few photos as I did the cutting. First the plan:

Next, the cuts.

The moment of truth...

Next step was to test fit the firebox in the outer pot and plan on where to cut to allow air to enter.

I used my diamond hole saws ($20 for the set from Princess Auto) to add a few more air holes just above the fire grate. I don't know how necessary these are, but the big green eggs have them so I followed suit.


Things were moving right along. I cut a hole in the outer pot just large enough to insert a piece of 1.5" X 3" rectangular tubing as an air inlet.


I slid the pipe into place and traced the profile of the intersection between the inside of the pot and the pipe.

This is another test fit of the firebox into the outer just to confirm it would all go together when the air inlet pipe was put in place.

I rough-cut the tube along the pecil line, then machined the end on my milling machine so I would have a good sealing surface for my damper.

Having roughed-in the air inlet pipe and the firebox, I thought it might be about time to make the grill fit. Turns out "Universal fit" isn't all it's made out to be. I sliced and diced, bent, and re-welded the grill. You'll see the final version in a couple of photos.

At this point I was itching to find out if the flower pots would take the heat. I'm a big believer in a quick and dirty prototype before investing a lot of time finishing things. At this point I had only put in about 4 hours work and $110. If the thing was going to explode on me, I wanted to know now. I used some steel wool to plug the unwanted holes in the bottom of the lower pot. The finished grill can also be seen in this photo.

I pulled the basic supplies together, and lit the coals.

I used a chunk of angle iron as a primitive damper to control the airflow.

- Prototype version of an air damper
Where there's smoke, there's fire!

I tried to warm it up slowly, but I still heard some disturbing cracks and pops from inside. I have to admit I was a little disconcerted. On further inspection though, only one crack was visible on the inner firebox. I've since used the grill 20-30 times and I haven't had any further cracking of the firebox. There is just one big crack top to bottom that opens and closes as the firebox heats up and cools down.
At this point I had hot coals for the first time, so I decided to throw a couple of burgers on for the heck of it. They cooked pretty slowly, because I was being timid with the heat, but were very tasty and juicy. So far so good!

This is as far as I got on the first night. I had put in 7 or 8 hours including the first fire test, and was very encouraged to continue.
Next up: Refinements.
I made up an inlet air damper, which ended up working quite nicely. It will form a near-perfect seal when closed and tightened down. It seems to pivot well and it's easy to control the airflow. I have a welder so I just welded a nut on the inside of the tube, and used a bolt as both a pivot and a clamp. I welded a short chunk of 1/4" rod to the top of the bolt to create a nice handle. The whole assembly is held in place with kitchen and bath silicon caulking, which is rated to 400F (204C). The outside of the base only seems to get to about 160F (70C) so I figured it would take the heat. So far so good.

I used the same concept for the exhaust damper assembly. I also added a handle to allow me to lift off the lid without gloves. While I was at it, I added a thermometer. It was a replacement part from a hardware store, and cost around $10.

I still hadn't sorted out a good gasketing system to go between the upper and lower pots, so I broke down and paid $30 for a genuine replacement big green egg gasket.

Here's the gasket in position.

This completed day 2 of working on the project. I probably put another 6-8 hours in, including cutting the hole for the exhaust damper, drilling for the thermometer, building the inlet and outlet dampers, installing the gasket.
At this point, I was pretty happy with my Little Blue Egg. The coals started easily, the food was tasty and juicy, and generally all was well except on the ergonomics front. It was a bit of a pain having the grilling surface only about 12" off the ground. Bending over to tend the food also meant smoke in the face.
I decided to put it in a proper base. I bought a cheap butcher block table from Ikea (about $50) and cut a hole in the top.

I put a couple of coats of UV resistant Spar varnish on the table to protect it from the weather. I had previously measured the outside of the egg and found that it never seemed to get over 70 degrees C, so I wasn't worried about putting it in direct contact with the wood.


And here are a few photos of some smoked salmon I made on the egg a few days ago.


Here are some ribs cooking. Mmmm, smoky.

Next up: a side wing for the table so I have a place to put a plate, and a better lid lift mechanism. Lifting the lid by hand works ok, but it's a little awkward now that the grill is up higher. I think I might also come up with a cover plate for the exposed underside of the flowerpot around the exhaust damper to make it look a little more finished.
If you made it this far, thanks for reading.
Nigel