Saturday, September 8, 2012

Shelf brackets - clever carriage bolt holes

I'm making a set of shelves for our dining room.  It's a race between me and 9+ month old Oscar.  Will I finish them, or will he crawl first.  The fate of all our breakable stuff lies in the balance.  As of today, he's winning.


Update:  He won.  The shelves are about 50% finished, he's crawling at about 25% speed.


Here's what the shelf brackets look like:


I'm securing them with carriage bolts, countersunk at the back with nuts.


The bottom ones are quite long, so I didn't want to just use a drill as I don't have a long enough one, and even if I did, getting it to run straight would be problematic.
So I made them out of 2 pieces glued together after cutting a slot in the middle with a 90deg grooving router bit.   


This makes a lovely square hole which fits the head of the carriage bolt perfectly. 
 

Sunday, August 19, 2012

Apple grinder

Last year was our second annual apple day where we gather up a bunch of friends and grind apples, press cider.  It was a good year for apples, we bought and gleaned many large containers from around the countryside.
On the big day, everyone assembled and we set to work.  We hadn't found a grinder, so our plan was to just cut them up small and use a grape press like this one to press the juice out.  Apples are much tougher than grapes.  We got no juice.
We had enough people there that someone knew someone else with an apple grinder, however it was a completely manual one of terrible design.  It took a crew of strong people to operate.  One to crank, the other to smash with a hunk of plywood and 2 to hold the whole thing down.
Things were not looking good, so we set up a second team to use a food processor to sliver the apples.

In the end, we did manage to make 78L of cider, but promised to have a better system next year.  I did some research, and came across this page on the importance of the grinding process.

To press apples, you have to break all of the cell walls first.  After that the pressing is easy.

With that in mind, we set out to design a grinder.  We had many ideas, most scary and dangerous, some involving stacked saw blades, like a dado, but as wide as an apple.

We settled on making something like the grater attachment on a food processor, except made out of slots for more grinding and less slicing.

 
First we had to turn our square piece of salvaged aluminum into something round.


We got the initial shape using a circle cuter, but eventually had to switch to the milling machine to remove the bulk of the material.

 
We then carved 6 slots in the face, drilled and taped the back side to fit into Nigel's large grinder.


We then tried it out, with less than successful results.  The apple seemed to be just floating on the flat parts, with almost no grinding.  The little bit of juice it did produce however was encouraging, as it covered the ground, fence and my shirt in a fine apple mist. 


Back to the milling machine, we carved out much more, making many more ridges and also machining down the back sides, like a drill bit.


Now we had something.  We then wiped together an enclosure of pipe.  The apples are fed through the upper port on the left of the photo and a stick is used to push them into the impeller through the lower port.  We screwed a bunch of wood screws into the end of the stick to stop the apples from spinning.

Note the bowl full of apple pulp.

 
This seems to work really well.  We'll put a longer pipe on the apple chute for more capacity in the bin.  The plunger keeps them all from falling in at once, when one apple is done, simply pull it out to load the next apple.

So far we are really happy with how it's turned out.  We can process 1 apple every 3.5 seconds and the pulp is nearly perfect.  The seeds stem and skin are left mostly intact while 95% of the meat is rendered into a pulp of juice and fiber, perfect for pressing.


Magic windows at the cottage

Here's a video of the magical windows that were at a cottage we rented.


They work really well, except it won't work so well for insulated walls, or double pane windows as the weight is already almost as much as I could comfortably lift.  I guess if you used pulleys with counterweights, it could work fine.

Other than that they are great, gives the place a nice clean look when they are open.

Friday, July 13, 2012

Massively overbuilt bean tripods

Last year my pole bean structure fell down, 3 times.  Once really wasn't my fault, as the tree behind it was throwing branches at it in a mega windstorm.  The other times were, as I had used standard tomato stakes to hold up the ends, but the bean load was just too much.

This year is different.

I used 3 full 8' 2x4s for each side, angling them to get a final height of just over 6', the height I can comfortably pick beans without having to haul a ladder into the garden.  The horizontal stringer is an old  clothesline with clothesline tensioner, abandoned by a previous owner.


The vertical stringers are bits of binder twine from the straw I use as mulch.   At the end of the growing season, it's easy to pull the twine out and compost the beans.

I've seen some people use page wire fence to grow beans on, but unless you have goats, it's really a pain to strip off the old beanstalks in the fall.  Leaving them there for multiple seasons promotes rot.

Saturday, May 5, 2012


Here's some hooks Nigel and I made last year.

They are fun, but I won't presume I know enough about forging to instruct anyone.

However, I needed some matching fasteners.  Rather than make some screws from scratch, I bought some standard machine screws from the hardware store and put the heads in the forge.  Heating them up red hot and then bashing them around with a hammer gets just the right look, while the other end remains unchanged.  The hooks and screws are then warmed with a torch and painted with beeswax.
They have been hanging in my kitchen for almost a year now, no noticeable change in finish.
I'm interested in making more, contact me if you'd like some.


Posted by Picasa

Tuesday, May 1, 2012

Saturday, April 28, 2012

Martini-O-phone

Music - shaken, not stirred.

I made this a few years ago and recently discovered it as I was doing some cleaning.

The guts are a M+S Paia stereo microphone kit, and the result of a trip to the liquor cabinet and plumbing section.

It's for sale on my Sculpture site.

The case that it came in was a box, and quite boring, but functional.
The body of mine is a martini shaker that I was about to get rid of which I took with me to the plumbing section.  The neck of the shaker just happens to fit into a brass sink drain pipe.  The shaker is stainless, so I can't solder it, but I pinched it between the lip on the brass tube and a copper pipe splice, soldered in place.

The pipe then get's soldered to a large 90 deg copper elbow.  A M+S (mid side) mic needs 3 elements which are housed in a straight 1/2 inch copper coupling, and 2 90 degree elbows jammed in and soldered in place.


The elements are epoxied to two wires that stick out from the body.  Because the case of the microphones are connected to ground, I isolated them using a primer coat of epoxy to avoid ground loops.  The brass screen cage also is attached with epoxy because it has to go on after the microphone elements, so I can't use a torch to solder, lest I melt all of the wires.

 
The finish on the body was made by "painting" the stainless shaker with a torch.  This has aged quite well, no noticeable degradation in the 2 years I've had it.

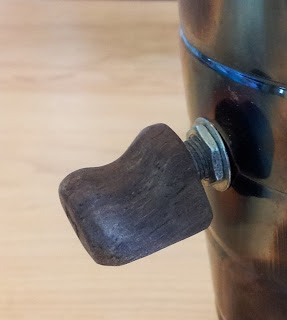
I think the best idea to come out of this project are the free form knobs carved with a rotary tool, labels burnt into the end with a soldering iron.


this one looks like it needs more finishing oil to make it more shiny.
 

Sunday, April 22, 2012

The joys and dangers of sharp tools, or alternative nut shaping techniques


I've recently come into some old hand planes that belonged to my grandfather and one probably from his father.  When well polished (I use whetstones, up to 8000) they are impressively efficient, even in this day of power tools.  They also don't make dust and are quiet, two advantages when working with an infant under your jacket.  The rocking motion also puts him to sleep.

That's not what this post is about though, as there's lots of info out there about plane sharpening and use.
I'm in the process of building a guitar and need to shape the nut.  Usually this involves lots of sanding, a painfully slow process I avoid whenever I can.  Instead I set the plane on my lap and started taking nice fine shavings off the side, leaving a perfect finish.  The nut is made from cow bone and doesn't seem to wear the edge.

the only problem is...
------------------Warning: After the break, there be blood-------------------

Tuesday, March 20, 2012

Pea pod earrings


While the idea certainly isn't new, her's my take on the 3 peas in a pod earring that I made for my wife for Christmas.  Quite simple construction, I started with a piece of paperboard and some scissors and cut until I got the shape that I wanted.  I then traced them out on to a thin sheet of brass I had and with pliers folded in to a rough pod shape.  The peas are made by melting some (lead free plumbing) solder with a torch.  I soldered the ends first, then slipped the peas in and with a dull chisel bent the pod around them.  Finally I used a fine brass wire wheel on a rotary tool for polishing.


This will probably be my last earring like thing I make.  A bit too small and fiddly, a bit too much like the electronics I do for a living.

Monday, March 19, 2012

trellis


I hate the standard trellises.   I think they are ugly and cutting them to shape is a pain, usually resulting in splinters.


This one is made from spruce 1 X 4 's that I resawed in half on the bandsaw, since I didn't have a table saw at the time.  The "apex" is bolted together with threaded rod and nuts, the ends are screwed to the breezeway and then trimmed to length with a handsaw.

Unfortunately the nasturtiums that we planted at the base last year didn't climb.  This year we will try morning glories, hopefully they will do better at hiding the industrial area from the residential section of our place.


I was going to use my radial arm saw to rip the boards, but because they were 8' long I would have had to swivel the saw to get enough length before then ends hit the door.  Bad idea.  Too much wiggle.  Just because you can do it with the RAS, doesn't mean that you should.


Posted by Picasa

Robot railroad spike bird


Here's a photo of my latest project, a bird made from welded railroad spikes.

Last fall a friend and I "liberated" about 600 lbs of railroad spikes and only got them as far as the front yard before exhaustion set in.  The more I use up this way, the less I have to haul around back to the industrial zone before my wife looses patience.

The welding is fairly difficult, especially since this is my first welding in about 15 years.  The spikes are either rusty or covered in paint, so getting the arc to start is challenging.  Holding the pieces is also a bit of a juggling act as well.  He'll be great in a few years when he's uniformly rusty.

I've got 550 pounds of spikes left, so I was thinking of making a dinosaur, one with a bunch of back spikes, like a Dacentrurus.  Or a hedgehog, or a porcupine.  Suggestions welcome.

"Oscar! No running near the impaling lawn sculptures!"

Update:

Just sold it to a guy down the street.  My first outdoor sculpture sale.  I'll use the money to buy more welding rods.

Posted by Picasa